Introduction
Remodeling your home doesn’t have to be a million-dollar project filled with contractors, chaos, and dust clouds. In fact, with the right mindset and a plan, even modest updates can make your home feel brand new.
Whether you’re trying to add value before selling, breathe new life into outdated spaces, or simply fall back in love with your home, this guide is for you. We’ll explore how to remodel every area of your home on a realistic budget, how to avoid the most common DIY mistakes, and how to transform your living space step-by-step — without losing your weekends or your wallet.
Let’s start your remodeling journey with a vision, a plan, and a little elbow grease.
🧭 Step 1: Defining Your Remodeling Vision
Before grabbing a hammer or scrolling through Pinterest, take time to understand your goals.
1. What’s Your Why?
Ask yourself:
- Are you remodeling to increase property value?
- To create a more functional space for your family?
- To match a new lifestyle or aesthetic?
Your “why” defines your “what.” For instance, if your goal is resale, focus on high-ROI projects like kitchens, bathrooms, and curb appeal. But if your goal is comfort or aesthetics, you can direct attention toward lighting, layout, and decor.
2. Visualize Your Ideal Space
Create a vision board with images, paint swatches, and layout sketches. You can use Pinterest, Canva, or even a corkboard. Seeing your ideas together helps identify recurring themes — like minimalist design, boho tones, or industrial vibes.
3. Set a Realistic Budget
Be brutally honest about what you can spend. Then break it down by area of focus (e.g., kitchen $2,000, living room $1,000, bathroom $1,500). Always reserve 10-15% for unexpected costs.
DIY Tip: Look for reuse and upcycle opportunities. A coat of paint, new handles, or repurposing old furniture can cut remodeling costs by up to 60%.
🔨 Step 2: Planning Each Space with Purpose
Let’s break down how to remodel each major area of your home effectively.
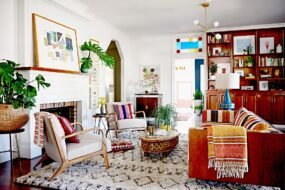
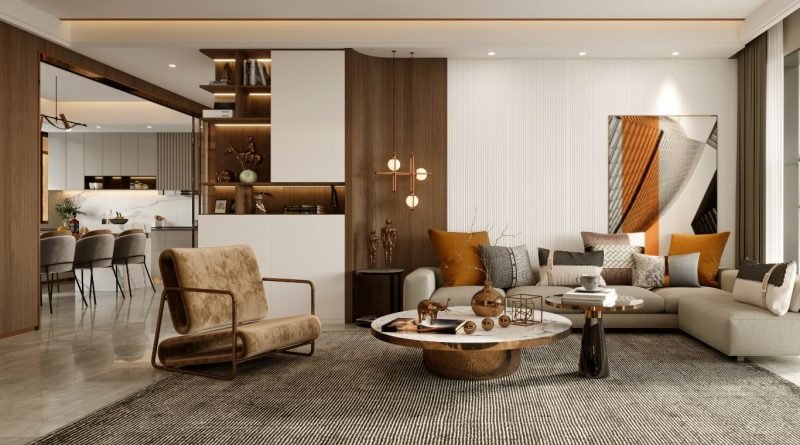
🛋️ The Living Room: The Heart of the Home
Your living room sets the tone for your entire home. A successful remodel focuses on lighting, layout, and layers.
1. Light It Right
Swap outdated fixtures for modern pendant or recessed lighting. Use layered lighting — a combination of ambient (main lights), task (floor lamps), and accent (wall sconces or LED strips).
2. Create a Focal Point
It could be a gallery wall, a fireplace makeover, or a statement TV console.
DIY Idea: Build a faux fireplace using MDF panels, paint, and adhesive. Add LED candles or string lights for an affordable, cozy look.
3. Smart Furniture Layout
Arrange furniture to create conversation zones. Avoid pushing everything against walls — floating furniture creates a more inviting flow.
Pro Tip: Use a large area rug to anchor your space. It defines the living zone and adds warmth instantly.
🍳 The Kitchen: Function Meets Style
The kitchen is the heart of every renovation — and one of the best value-adding rooms in your home.
1. Cabinet Refresh
Instead of replacing cabinets, repaint or re-stain them. Try two-tone cabinets (light upper, dark lower) for a modern contrast.
DIY Hack: Change cabinet handles and knobs — the impact is huge for under $100.
2. Countertops on a Budget
If new quartz or marble isn’t in your budget, consider peel-and-stick countertop films or epoxy coating kits.
3. Backsplash Upgrade
Subway tiles, peel-and-stick panels, or even painted patterns can add a fresh, contemporary touch.
4. Lighting Matters
Under-cabinet lighting gives your kitchen a professional, polished look while improving task visibility.
🛏️ The Bedroom: Comfort & Calm
Bedrooms should be your personal sanctuary.
1. Paint and Palette
Soft neutrals like sage, beige, or warm gray promote calmness. Add an accent wall using wallpaper, stencils, or texture paint.
2. Headboard Hack
Make your own upholstered headboard using plywood, foam, and fabric. It’s affordable and completely customizable.
3. Storage Smarts
Floating shelves, bed risers, or hidden drawers under the bed help you maximize limited space.
Bonus Tip: Upgrade your lighting to dimmable fixtures — mood lighting improves relaxation and sleep quality.
🚿 The Bathroom: Small Space, Big Impact
Bathrooms are often small but can make a massive design statement.
1. Tile Refresh
If your tiles are dull, try tile paint or stencils. For a modern aesthetic, use matte finishes and neutral tones.
2. Fixtures Upgrade
Replace old faucets, towel racks, and shower heads — it’s inexpensive yet instantly modernizes the room.
3. Vanity & Mirror
Refinish your vanity in a bold color (navy or forest green) and pair it with a round mirror for a chic boutique look.
DIY Lighting Idea: Install LED strip lights behind the mirror for a luxury feel.
🧺 The Laundry Room: Functional Chic
Even utility rooms deserve love.
- Install open shelving above the washer and dryer.
- Use labeled baskets for sorting laundry.
- Add a folding table or countertop made from reclaimed wood.
- Consider a fun backsplash or peel-and-stick wallpaper to brighten the space.
🌿 The Outdoor Area: Extending Your Living Space
Outdoor living is one of the biggest home trends today.
1. DIY Deck or Patio Upgrade
Paint or stain your existing deck, or create a gravel patio with outdoor furniture.
2. Lighting Magic
String lights, solar lamps, or lanterns make evenings cozy and inviting.
3. Outdoor Kitchen or Fire Pit
Use cinder blocks and a metal grate to build your own backyard grill or fire pit.
4. Vertical Garden
Install planters or hanging baskets on fences for an eco-friendly, space-saving garden.
🧰 Step 3: Smart DIY Techniques to Save Time & Money
1. Learn Basic Skills
You don’t have to be a professional. Platforms like YouTube, Skillshare, and Home Depot workshops can teach you painting, tiling, or woodworking basics.
2. Rent, Don’t Buy
Power tools like sanders or nail guns can be rented for a weekend from hardware stores — saving hundreds.
3. Prep Before Painting
Don’t skip sanding, priming, and taping edges — prep is 80% of painting success.
4. Measure Twice, Cut Once
Classic but essential. Always double-check measurements before cutting materials or drilling holes.
5. Safety First
Wear gloves, goggles, and masks. Keep a first aid kit nearby and unplug power tools when not in use.
💡 Step 4: Creative Remodeling Ideas Room-by-Room
| Area | DIY Idea | Cost | Time | Difficulty |
|---|---|---|---|---|
| Living Room | Floating shelves + LED lighting | $60 | 1 day | Easy |
| Kitchen | Repaint cabinets + new handles | $150 | 2 days | Moderate |
| Bathroom | Tile stencil + new mirror | $120 | 1 day | Easy |
| Bedroom | Upholstered headboard | $100 | 3 hrs | Moderate |
| Outdoor | Pallet seating set | $80 | Weekend | Moderate |
🪴 Step 5: Eco-Friendly Remodeling
Sustainability isn’t just trendy — it’s responsible.
- Use Low-VOC Paints to reduce indoor pollution.
- Install LED bulbs — they last longer and use 80% less energy.
- Repurpose Old Materials: Old doors can become tables, and wood scraps can be turned into shelves.
- Water-Saving Fixtures: Low-flow taps and toilets reduce waste.
- Energy-Efficient Appliances: Save long-term by investing in energy-rated fridges, washers, and ovens.
🎨 Step 6: The Finishing Touches
Remodeling is 80% structure and 20% styling — but that final 20% is what makes the magic.
- Use throw pillows and rugs to add personality.
- Frame wall art or family photos.
- Layer lighting with candles, lamps, and dimmers.
- Incorporate scent — diffusers, incense, or candles make your home feel alive.
Pro Tip: Keep decor cohesive by sticking to a 3-color palette rule: 1 dominant color, 1 secondary, and 1 accent.
🧠 Step 7: Avoid These Common Remodeling Mistakes
- Skipping Prep Work — rushing through sanding or cleaning leads to poor finishes.
- Overdecorating — simplicity always wins in small spaces.
- Ignoring Scale — furniture too big or too small throws off balance.
- Underestimating Cost — always expect 10-15% extra expenses.
- Poor Lighting Choices — never rely on one light source.
💬 Step 8: Remodeling for Resale
If you’re planning to sell soon, focus your energy where it matters most:
- Curb Appeal: Paint your front door, add plants, and clean pathways.
- Kitchens & Bathrooms: Modern hardware and neutral tones attract buyers.
- Flooring: Laminate or vinyl plank flooring offers a high-end look at low cost.
- Neutral Paint: Stick to timeless tones like greige or warm white.
📅 Step 9: Maintenance After Remodeling
After the dust settles, keep your space looking new:
- Touch up paint every 6 months.
- Re-seal countertops annually.
- Deep-clean carpets quarterly.
- Rotate furniture to avoid wear marks.
- Keep an inventory of leftover paint and materials for quick fixes.
🏁 Conclusion: Your Home, Your Masterpiece
Remodeling isn’t about chasing perfection — it’s about creating harmony, function, and happiness in your home. Each nail hammered and wall painted brings you closer to a space that truly reflects your lifestyle and taste.
Whether you’re upgrading one room at a time or tackling a full home transformation, remember: great design is built with patience, creativity, and consistency.
Start small. Learn as you go. Enjoy every improvement — because every project adds value not just to your home, but to the pride of building it yourself.